Easy Camping Meals That Wow!
With a little planning and a hot fire, you can enjoy delicious camping meals that are sure to impress your tent-mates.
Camping doesn’t have to mean you’re relegated to oatmeal, freeze-dried meals, or baked beans in a pie plate. With a camp stove and a little planning, you can enjoy hot, delicious meals right outside of your tent. To make things easier, do a lot of your cutting and preparation at home so when it’s mealtime, all you have to do is put it together and set it on the camp stove. Here are 4 camping meals that are super simple yet especially delicious when enjoyed in the great outdoors.
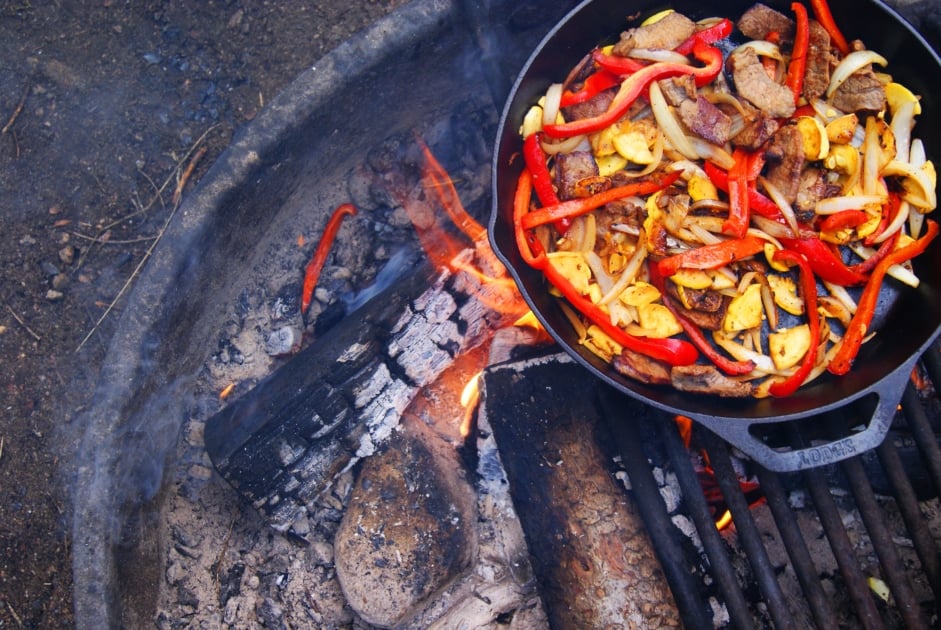
Camp Fajitas Recipe
Ingredients:
- ¼ cup fresh lime juice
- 2 tablespoons olive oil
- salt, to taste
- 4 cloves garlic, minced
- 1 teaspoon cumin
- 1 lb. flank or skirt steak (or boneless chicken breasts) sliced into strips
- 1 onion, sliced
- 1 red bell pepper, chopped
- 1-2 jalapeno peppers, diced
- aluminum foil
- 1 bunch of cilantro, chopped
- 1 avocado, chopped
- shredded cheese
- sour cream
- 4 10-inch flour tortillas
Instructions:
- What to prep at home: Make the marinade: Mix the lime juice, olive oil, salt, garlic, and cumin together in a sealable bag. Add the meat. Allow the meat to marinate for at least an hour in the fridge then transport to a cooler for travel. Slice the onion and red bell pepper into strips, chop the jalapeno pepper, and place in a separate container.
- When you’re ready to cook at the campsite: add the vegetables and meat to a large sheet of heavy-duty aluminum foil and wrap. Add 2-3 more layers of foil, wrapping well to avoid any of the moisture from spilling out.
- Place the foil packages on the camp stove. Cook on medium heat for approximately 10 minutes, then turn them over and cook for another 10 minutes on the opposite side. Be sure to use hand protection while turning or removing the foil packet, place on a plate and open to spoon out the meat and vegetables onto the tortillas. Add fresh cilantro and avocado, as well as sour cream and cheese if desired. Wrap and enjoy. Serves 4
- Note: If you have a favorite cast iron pan you can bring, by all means, use it!
Favorite Camp Frittata Recipe
Equipment:
- camp stove
- nonstick ovensafe frying pan
- Chef’s knife
Ingredients:
- ½ eggs
- ½ red pepper, chopped
- ½ onion, finely chopped
- ⅔ cup mushrooms, chopped
- 2 tablespoons butter
- 3 strips of bacon, cooked and crumbled (optional)
- salt and pepper, to taste
Instructions:
- What to prep at home: Place all of the chopped vegetables and the bacon (if you’re using it) in a sealed bag. Scramble the eggs in a bowl, and pour them into a separate sealed container or bag. Transport along with other perishable food items in a cooler to the campsite.
- At camp: Start the stove and place a 9×9″ square pan (a disposable aluminum one is fine) on the heat. Add the vegetables (and bacon, if using) and cook over medium heat until they’re soft.
- Add the eggs and cover with a piece of foil. Cook on medium-low heat for approximately 15-20 minutes until the center is set. Serve immediately. Serves 4.
Mountain Top Monkey Bread Recipe
Ingredients:
- 1 teaspoon cinnamon
- 1/2 cup sugar
- 1 tube Pillsbury Grand® biscuits
- 3 tablespoons butter (a little less than half a stick)
Instructions:
- What to prep at home: Mix the cinnamon and sugar together and put in a plastic bag.
- Pop open the container of biscuits and cut each round into quarters, then roll into balls. Place balls in a bowl and sprinkle with the cinnamon sugar, making sure all of the dough is covered. Transport to camp.
- At camp: Pull out a large sheet of heavy-duty aluminum foil, and add a few dots of butter on the bottom. Add a layer of dough and a few more pats of butter creating a couple of layers. Add more butter on the top.
- Seal fully with foil, leaving enough room for the dough to expand. Then add a second sheet. Cook over the stove on medium heat for roughly 10-15 minutes on each side. You’ll want to rotate the package a few times during cooking. Take a peek when it’s almost done (but be careful of escaping steam!) to see how many more minutes you need. Bread will be done when it has puffed up and bubbly. Serves 4-6.
Chicken and Dumplings Recipe
Equipment:
Large pan (e.g. aluminum lasagna pan)
Ingredients:
- 3 lbs. chicken, cooked and cubed
- 2 carrots, finely chopped
- 1 onion, finely chopped
- 2 stalks celery, chopped
- 2 tablespoons cooking oil
- 32 oz. chicken broth, boxed
- 3 tablespoons corn starch
- 1 tube regular refrigerator biscuits, such as Pillsbury
- 1 teaspoons thyme, dried
- salt and pepper, to taste
Instructions:
- What to prep at home: Chop the vegetables and place in one container, and add your cooked chicken to another. Transport along with other perishable food items in a cooler to the campsite.
- At camp: Heat the oil in a large pan (an aluminum lasagna pan works great), and add the vegetables. Cook for several minutes until they soften. Add the cooked and cubed chicken. Then add the chicken broth, reserving 1/2 cup.
- Add the corn starch to the reserved 1/2 cup of chicken broth and stir well. Then add it to the chicken and vegetables, stirring thoroughly.
- Place a large piece of aluminum foil over the top and allow to cook on medium-low heat for 20 minutes. While the chicken and vegetables are cooking, open the tube of biscuit dough and cut each into quarters. Press the dried thyme into each dumpling.
- After the chicken and vegetables have cooked for roughly 20 minutes, drop the dumplings into the pan. Cover with the foil and allow to cook for another 10-12 minutes. No peeking! When you remove the foil, the dumplings will be fluffy and soft. Serves 4-6.
Do you have any great meal ideas you’ve prepared at the campsite? Share with us in the comments below!
Check out these helpful camping tips – don’t head outdoors without them!


Amy Grisak
Amy Grisak is a freelance writer, blogger, and photographer specializing in gardening, local food, and stories about her home state of Montana. She enjoys sharing her experiences with self-reliant living and outdoor recreation. Her article on the "hugelkultur" gardening technique appears in the 2021 Farmers' Almanac. You can follow her topics on her site, AmyGrisak.com.
- Amy Grisak#molongui-disabled-link

- Amy Grisak#molongui-disabled-link
- Amy Grisak#molongui-disabled-link
- Amy Grisak#molongui-disabled-link


Peal a yellow onion. Using small paring knife cut a small hole halfway through center of of onion and place in one billion cube. Place onion on double thick square of heavy duty aluminum foil. Place a pat of butter on top of onion. Bring corners of foil up and twist closed at top. Place on coals and cook until onions soft. About 30-45 mins. Open in a bowl and enjoy onion soup. This can be prepped at home and stored in zip lock in you ice chest.
TALKING ABOUT PUTTING POTATOS IN THE COALS USING HEAVY DUTY FOIL PUT SOME BUTTER AND SPICES ON THEMM WRAP THEM WELL AND DROP THEMM IN YOUR COALS .YOU CAN ALSO PUT CORN ON THE COB THE SAME WAY.
When fire is of at night, but ashes are still hot, we use to buried some potatoes and leave them over night, or at least for several hours. You can use foil, if you don’t like eat it with ashes, which are actually good for you. But for sure, it will be the best potatoes you’ve ever had!
Marybeth read the bottom of the recipe. It says serves 4-6. sounds yummy for sure..
Sure sounds delicious (all four recipes).
Reminded me of camping out as a kid. One of our favorites was called “roast in the hole”
required a good fire (for the coals), a hole, (a dutch oven, only for the timid), a roast, baking potatoes, spices (the usual suspects), and plenty of aluminum foil. half the coals went on bottom, roast and potatoes followed, remainder of coals on top, fill the rest of the hole with dirt, tamp down lightly, then go about the days planned activities. Suppertime approaches, time to (carefully) retrieve the vittles from the hole in the ground oven. Of course, the goods were placed in the Dutch oven if the cook wasn’t to sure about his/her getting the goods out of the hole without cutting into the foil wrapped goodies, In that case, not as much foil was needed as all the goodies went into the dutch oven before going in the hole. Mighty good eating either way! 😀
Thanks (muchos) for your recipes here!
How many servings are in each recipe?
Hi Marybeth S. If you look at the end of each recipe it includes the serving sizes.